
|
Sergei Chikuyonok
Eclipse: Introduction to Ant March 4, 2009 |
|
| Task: |
to learn how to let the computer do all the hard work. |
||
When talking about integrated development environments (IDEs) I often hear that their functionality is excessive for daily tasks. There is some truth to that: IDEs bring with them new entities, foreign mechanisms, loads of new settings that you never knew even existed. But let’s not forget that working in an IDE is an entirely different level of development which means that some of traditional tasks are solved differently. The benefit of an IDE is that the developer has the ability to collect under one roof (i.e. in a single application) lots of different tools that will not only solve their own individual tasks but also work together. This opens up entirely new ways of working with a project.
In previous articles I talked about instruments for working with source code, today we will start to learn working with an entire project. We’ll start by learning how to automate routine tasks with Ant.
Apache Ant is well known to any Java developer. It is a popular software build tool written entirely in Java. It is supported by all major IDEs: NetBeans, IntelliJ IDEA, Eclipse. An Ant build scenario is a simple XML file. Despite its Java orientation, even web developers can use Ant to solve their tasks.
Hello world!
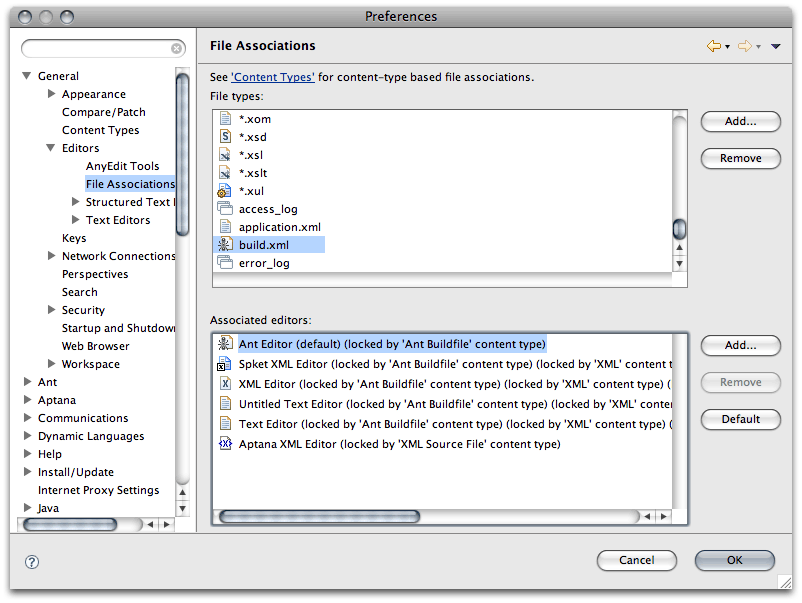
Let’s start learning Ant with a classic example: printing Hello World! to console. First we need to ensure that the build.xml file (which is a traditional name for a build scenario) is associated with Ant Editor in Eclipse. Go to Preferences → General → Editor → File Associations and look for the build.xml file associated with Ant Editor. If there is no such entry, add it manually: first click the Add button near the File types field and enter “build.xml,” then select the newly created entry, click the Add button by the Associated editors field and choose Ant Editor from the list. Select Ant Editor and click the Default button.
- Let’s create a new project and call it ant-test.
- In this project create a new file named build.xml. The file should open in Ant Editor.
- ЗType the following scenario:
010203040506<?xml version="1.0"?> <project name="my_test_project"> <target name="hello-world"> <echo>Hello world!</echo> </target> </project>
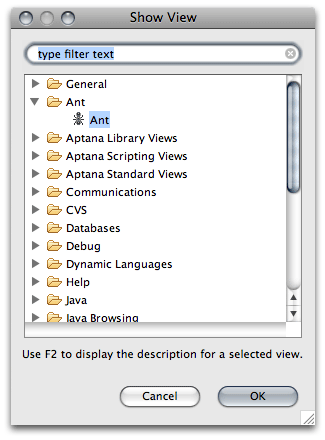
- Open Ant view: Window → Show View → Other...
- In the newly opened view click the
 icon, find the build.xml file and double click it. Now this view displays our scenario which can be conveniently tested.
 - Expand the my_test_project list and double click hello-world. The text “Hello world!” should appear in the console.
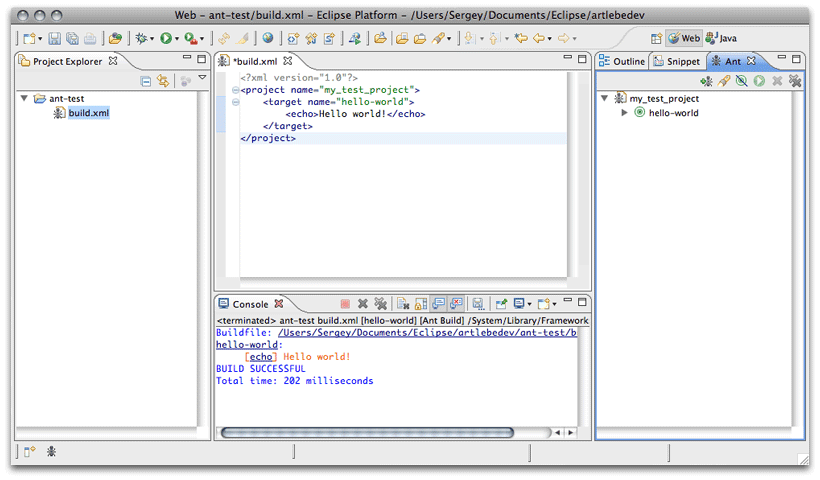
Let’s have a closer look at the scenario structure. The parent element is <project> with the attribute name which is the name of the build scenario.
Inside the <project> tag is the <target>, which has the <echo> tag inside. Here we approach two important notions in Ant that can be somewhat confusing, namely targets and tasks. In this case we ran the hello-world target (the mandatory name attribute of the <target> tag) using the <echo> task. To make it easy to remember, I suggest using the following rule: a target is what needs to be done and tasks denote the way it is to be done.
To get more comfortable using Ant let’s create something useful, for example compressing a set of JavaScript files with YUICompressor.
Let’s decide what we need to achieve. We have a set of JavaScript files that represent one library. To make sure this library loads as fast as possible, we need to combine all these files into one and compress the result with YUICompressor. Let’s create two folders in our ant-test project: js_src and js. We’ll store the source files in the first and the compressed resulting file in the second. Let’s create a couple of files in the js_src folder: file1.js, file2.js and file3.js and fill them with some code.
Now we need to write the build scenario. First, we have to specify what targets we want to achieve. We need to assemble the lib.js library (first target) for which we need to combine all files into one (second target) and compress them (third target). Here is the approximate scenario:
0102030405060708091011121314151617181920212223
<?xml version="1.0"?>
<project name="Build first JS lib" default="build-lib" basedir=".">

 	<target name="build-lib" depends="concat-files, minify">
		<echo>Done.</echo>
	</target>

	<target name="concat-files">
		<echo>Concatenating files</echo>
		<concat destfile="./js/lib.js">
			<filelist dir="./js_src">
				<file name="file1.js"/>
				<file name="file2.js"/>
				<file name="file3.js"/>
			</filelist>
		</concat>
	</target>

	<target name="minify">
		<echo>Minifying files</echo>
	</target>

</project>
Let’s have a look at new elements and attributes. The <project> element got a new default attribute. It is a target or a set of targets which will be executed by default when the build scenario is run. We will use it later. The basedir attribute sets a directory from which all file and directory paths will be calculated. It is not mandatory and by default is equal to the absolute path to the project where the scenario is located.
Note the depends attribute of the build-lib target. It defines targets on which the current target depends. In this case we are saying, “Run the build-lib target only after concat-files and minify were run.” This is a very convenient (but not the only) mechanism for using similar task sequences in different targets. One of the features of dependencies in Ant is that one target will run only once during a session. You can read more on that in the documentation.
As we can see from the example, we have an entry point which is the build-lib target (default attribute of <project>) which depends on two other targets: concat-files and minify. Concatenation of files is performed with the <concat> task. In the destfile attribute we set the destination file where the result will be saved. <filelist> file resource that we pass to the <concat> task specifies the sequence of files for concatenation. Everything should be clear here: we use the dir attribute to set the directory in which to look for files and use the <file> elements to choose specific files. There are a lot of resource types, though most of them are of use only to Java programmers. For us the most helpful are <filelist> and <fileset>. Their main difference is that the former specifies a strict set of files while the latter is used to create a set of files using patterns for inclusion and exclusion. For example, we could replace <filelist> with this code:
010203
<fileset dir="./js_src">
	<include name="*.js"/>
</fileset>
However this way has certain drawbacks. First of all, the set will include all files with js extension in the js_src folder which is not always desirable in real projects. Second, even if you use patterns to specify file names, this resource does not guarantee the files will be parsed in the order you want them to. Overall, if the order of files matters, it’s better to use the <filelist> resource.
One of the problems with the example above is that paths to folders are hard coded in the scenario, let’s move them out into separate properties:
0102030405060708091011121314151617181920212223242525
<?xml version="1.0"?>
<project name="Build first JS lib" default="build-lib" basedir=".">

	<property name="src.dir" value="./js_src"/>
	<property name="dest.dir" value="./js"/>

	<target name="build-lib" depends="concat-files, minify">
		<echo>Done.</echo>
	</target>

	<target name="concat-files">
		<echo>Concatenating files</echo>
		<concat destfile="${dest.dir}/lib.js">
			<filelist dir="${src.dir}">
				<file name="file1.js"/>
				<file name="file2.js"/>
				<file name="file3.js"/>
			</filelist>
		</concat>
	</target>

	<target name="minify">
		<echo>Minifying files</echo>
	</target>

</project>
Properties in Ant are set using the <property> tag. Properties are very similar to constants in programming languages: after setting them once you can’t change them during scenario execution. Properties can be called using the ${property name} construct. Properties can be set not only inside the <project> tag but also inside <target> and globally for the entire IDE in Preferences → Ant → Runtime → Properties.
|
Note |
We paid so much attention to opening build.xml files in Ant Editor for a reason: this editor has a very convenient code complete feature that works with properties, targets (in the depends, default attributes and so on) and with available tasks and their attributes. Be sure to use it when creating your own scenarios. |
Time to check the scenario: in Ant View double click the build-lib target. lib.js file should appear in the js folder with the contents of all three files. If the file did not appear, refresh the js folder in Project Explorer.
We’ve learned how to combine files, now it’s time to compress them with YUICompressor. The developer of this wonderful library recommends to call it as an external application. We will make it more interesting: we’ll create a separate task that will compress the files.
Ant’s modular structure allows to extend it by creating new tasks in Java. Now we’ll learn one of the ways to add such tasks to a build scenario.
- Download YUICompressor and unpack the archive into any folder, such as C:\yuicompressor.
- Download YUIAnt.jar and put it in the build folder created in the folder where you unpacked YUICompressor (C:\yuicompressor\build).
- Add this code to the scenario inside the <project> tag:
01020304050607
<taskdef name="yuicompress" classname="com.yahoo.platform.yui.compressor.YUICompressTask">
	<classpath>
		<fileset dir="C:\yuicompressor\build">
			<include name="*.jar"/>
		</fileset>
	</classpath>
</taskdef>
We have created a new task <yuicompress>. To make it work, we need to set the full path to the Java class for this task (com.yahoo.platform.yui.compressor.YUICompressTask) and the path for the file with this class (<classpath>/<fileset>). Now we can finish the minify: target:
0102030405060708
<target name="minify">
	<echo>Minifying files</echo>
	<yuicompress munge="yes" linebreak="5000" preserveallsemicolons="yes" outputfolder="${dest.dir}">
		<fileset dir="${dest.dir}">
			<include name="*.js"/>
		</fileset>
	</yuicompress>
</target>
We called the <yuicompress> task by giving it a set of files that need to be compressed with the <fileset> resource. Since we are using a task, not an external file, Ant Editor linked the right class and will now provide code completion for attributes of the <yuicompress> task. Here is the final build scenario:
0102030405060708091011121314151617181920212223242526272829303132333435363738
<?xml version="1.0"?>
<project name="Build first JS lib" default="build-lib" basedir=".">

	<property name="src.dir" value="./js_src"/>
	<property name="dest.dir" value="./js"/>

	<taskdef name="yuicompress" classname="com.yahoo.platform.yui.compressor.YUICompressTask">
		<classpath>
			<fileset dir="C:\yuicompressor\build">
				<include name="*.jar"/>
			</fileset>
		</classpath>
	</taskdef>

	<target name="build-lib" depends="concat-files, minify">
		<echo>Done.</echo>
	</target>

	<target name="concat-files">
		<echo>Concatenating files</echo>
		<concat destfile="${dest.dir}/lib.js">
			<filelist dir="${src.dir}">
				<file name="file1.js"/>
				<file name="file2.js"/>
				<file name="file3.js"/>
			</filelist>
		</concat>
	</target>

	<target name="minify">
		<echo>Minifying files</echo>
		<yuicompress munge="yes" linebreak="5000" preserveallsemicolons="yes" outputfolder="${dest.dir}">
			<fileset dir="${dest.dir}">
				<include name="*.js"/>
			</fileset>
		</yuicompress>
	</target>
</project>
Run the build-lib target and a compressed lib.js should appear in your js folder.
Assembling a project
Now for the most interesting part. The most convenient thing about integrating Ant with Eclipse is not that you can run the target from a window, but that you can set a builder for the project.
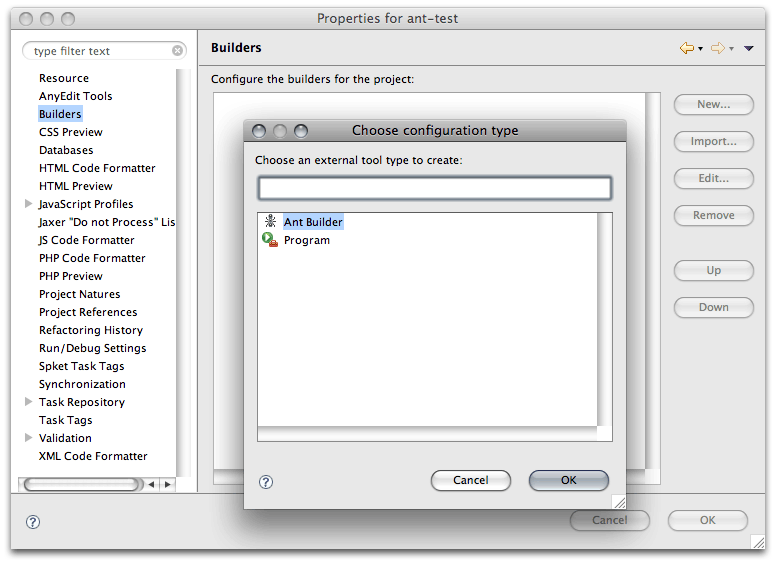
Go to the properties of the ant-test project (Project → Properties) and open the Builders menu item. Click the New button and choose Ant Builder. Set a name for your builder (such as My first Ant build). Now we need to choose a scenario, i.e. a buildfile. Click the Browse workspace button and choose the build.xml file in the ant-test project. Open the Refresh tab and check Refresh resources upon completion and the project containing the selected resource. It means that the project file list will be automatically refreshed after each builder run so that the recent changes are reflected in Project Explorer. Move over to the Targets tab, there you will see a list of targets that will be executed for different build types. In particular, it should say default target selected in the sections After a “Clean” and Manual build. It means that the default project target will run (remember the default attribute of <project>?). Let’s also set a target for Auto build. Click the Set targets button to the right of Auto Build and then OK, the default target will be selected.
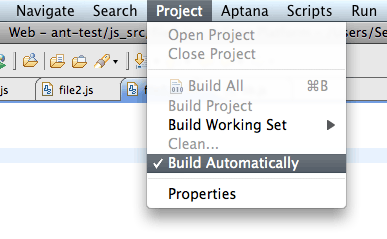
Now we can run the builder by choosing Project → Build Project (you can also assign a shortcut). And if we choose Project → Build Automatically, we wouldn’t have to do anything as the project will be built each time a file is modified.
Thus we achieved an absolutely transparent automation of routine tasks with the IDE. All we had to do was create a simple scenario, set it as a builder and enable the Build Automatically option. Each time you modify the project (edit, add or remove project files) all the necessary actions will be run in background. This is especially helpful when working in a team: any developer can make changes to the scenario which will automatically run for all other users.
In this article we covered some basic methods of working with Ant. I recommend having a look at the standard task list, it includes such useful things as synchronizing catalogs, uploading files via FTP, running SQL queries, XSL transformations, file archiving and many others.
In the next article we will continue to explore Ant by learning to write additional tasks in JavaScript. As a homework, I suggest you do the following: extract the <yuicompress> task definition into a separate file and connect it to the scenario (hint: use the <import> task and set a global property which will store the path to the file).
You can also see Ant in action in the lecture for studio’s technologists:
Additional materials:
— Screencast (QuickTime, 101 MB)
